I made this bust display stand because all the ones out there to buy were either super expensive, or flimsy and they kept falling over when I would make adjustment to he jewelry. Annoying! So, I figured I could make a better one myself! Which is what most people do when they are fed-up with things. I keep stuff around the house that I feel I might be able to reuse in some way like cereal boxes and old tee-shirts. Always trying to recycle and reuse! I even have a hard time parting with expired can food, I just hate the waste! These things all happened to come in handy when I was concocting this necklace stand in my head. This is a list of what I settled on using:
- My man's old grey Tee Shirt.
- A Double Cereal Box. The kind you find at Sam's Club, or Cosco. They are re-enforced inside.
- 2 expired 64oz Can Goods.
- A mostly used Glad Candle Holder, but you could use anything this shape.
- An extra piece of thin Cardboard. I used the front half of a waffle box.
- Some heavy duty Tape like Electrical, or Duct Tape.
- A spool Thread and a Needle.
- Some Quilting Batting Filler.
- Scissors.
- Hot Glue Gun and Glue Sticks.
- Permanent Black Marker.
Pictures of Supplies:
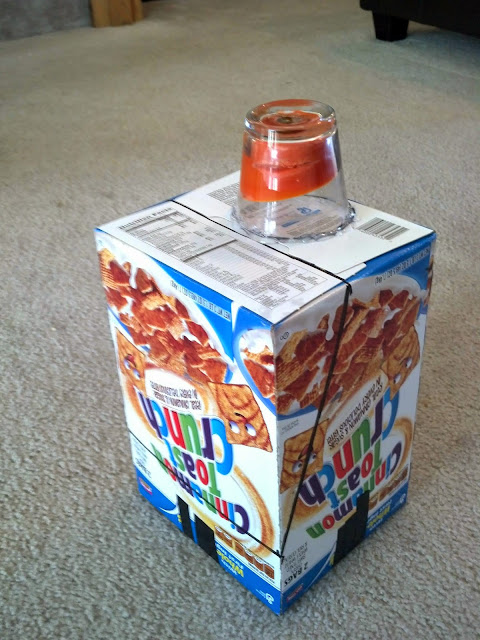
The first thing I did was tape up the bottom of the cereal box. Turn the box upside down. Then I placed the candle holder upside down on the back half of the box, centering it. I traced around the candle holder with my marker. Then removed the candle and drew a thick black line across the center of the box, right in from of the circle.
 |
2) Place the candle holder on
box. |
 |
| 1) Tape the bottom box. |
 |
4) Draw a line down center of
box top. |
 |
| 3) Trace candle holder. |
Next I am going to cut off the top front corner of the box to look like this:
This is how I did it: First I took the extra cardboard piece and laid it on top of the cereal box. This is so I could measure how long to make the cut down the front of the box. I lined the extra card board piece up with the top side of the box (the top is where I drew the circle) then I pulled it up toward the top, to give it about an inch overhang. I drew a line on the lower part of the box using the extra cardboard piece placement, as a guide. Second I connected the two lines I drew so far: The line that runs across the top center by the circle, and the line that runs across the bottom front that I just drew. I connected the two using a diagonal line, and used the extra piece of cardboard like a ruler to make sure its was straight. Then I cut around the box along the lines that I marked off. I was careful doing this because I wanted to use both sides of the box.
 |
1) Lay extra card board on front of box
with 1" overhang, and draw line. |
 |
2) Connect top line and front line with
a diagonal one. |
 |
| 4) Carefully cut along marked off lines. |
Before I did the actual cutting of the front top corner, I did these next two steps, but you can do it either way. Here I make the front covering of the necklace stand (the extra cardboard piece).
I placed the cereal box on top of the extra cardboard piece. I centered it, and traced along the box on either side. I folded the edges up on the extra piece of card board along each line.
 |
1) Center box on top of cardboard.
Trace along box edges. |
 |
| 2) Fold cardboard along lines. |
 |
| 3) Finished front cover piece. |
Now I hot glue the candle holder on top of the cereal box, where I drew the circle.
I put a thick ring of hot glue around the drawn circle. I did this quick because it dries fast! Then I put the candle holder on the ring of hot glue ASAP before it dried. I went around it again with more glue to make sure it was on there good.
 |
2) Place candle holder on
ring of hot glue quickly! |
 |
1) Put a thick ring of hot glue around
drawn circle. |
By this step you have to cut off the top front corner, because its time to put in the weights! I taped together the two 64oz unopened cans. Then I placed them inside the cereal box.
 |
| 2) Place cans in box. |
 |
| 1) Tape together cans. |
Now I taped on the front cover piece to the rest of the necklace stand.
I start with a couple pieces of tape, to make sure its even. Then I taped it up by wrapping the tape around the whole cereal box, and the cover piece until I felt it was secure.
 |
| 1) Tape on front cover piece. |
 |
| 3) Keep taping until it's secure. |
 |
| 2) Wrap around box. |
Time for the shoulders of the bust! remember the front top corner piece I cut off the cereal box? Time to use it! I drew a line down the middle of the corner piece and cut along it to make two halves. Then I turned the two pieces to look like a pair of shoulders.
 |
| 2) Cut along the line to make two halves. |
 |
| 1) Draw a line down center. |
 |
| 3) Turn halves to look like shoulders. |
Next I tape on the shoulder pieces. I adjust them until I am happy with the way they look. I then start taping away! I tape around the top, middle, and bottom of the box. I want to make sure they don't move when I stretch on the fabric cover later.
 |
| 1) Put on right shoulder. |
 |
| 2) Put on left shoulder. |
 |
| 4) Tape until secure. |
 |
3) Tape around the shoulder pieces
and the cereal box. |
Here I cut the quilt batting to make a pad for the front of the stand. The padding will camouflage any bumps. It is also nice to have a necklace stand with padding because you can stick pins in it to hang earrings from when you have a necklace/earring set. First I lay down the stand on a roll of quilt batting. I cut a piece that is about 1.5 inches shorted than the stand. I place the pad on the front of the necklace stand. Time to glue it on! I use the hot glue gun to Glue the pad t the stand. I make sure to wrap the pad around the sides, and glue it down firm.
 |
1) Lay stand on quilt batting roll.
Cut a piece that is 1.5" shorter
than the stand. |
 |
2) Place batting pad on the front
of the necklace stand. |
 |
| 4) Add glue to sides of the stand. |
 |
| 3) Hot glue the pad to the stand. |
 |
| 5) Wrap pad around sides. |
 |
| 6) What stand looks like with pad. |
Fabric Necklace Stand Cover:
OK! Almost done! Time for the fabric cover. I just use an old T-shirt. You can use any stretch fabric, though. I cut the top part of the T-shirt off, which turned it into a loop of fabric. I wanted it to be a long straight piece, so I cut the loop down the back center. I ended up with one flat piece of fabric. Time to whip out the needle and thread! I started the cover out by draping the fabric strip over the necklace stand to see how well it covered. I then stitched a running stitch along the back of the necklace stand, from shoulder to shoulder. I pulled the thread, and gathered up the fabric at the base of the back neck. I sewed the gathered material together in a bunch. Then I pulled the sides of the fabric tight around the necklace stand, and whipped stitched the two sides together in the back. I took the fabric cover off the stand, turned it inside out so the bunch and the back seam didn't show, and put it back onto the stand. I cut off what I felt was extra fabric on the sides. Here comes the hard part... finessing the cover until its tight around the front, with no wrinkles! I basically just began pulling in on the sides, and sewing them together in the back. I kept doing this until I liked the way it looked in the front. I also pulled the fabric cover down to the bottom of the stand, and sewed that together.
 |
| 2) Thread Time! |
 |
| 1) Cut top off T-shirt. |
 |
3) Drape fabric over necklace stand,
and center. |
 |
4) Sew running stitch from shoulder
to shoulder along the back. |
 |
| 6) Fabric is gathered. |
 |
| 5) Pull thread to gather running stitch. |
 |
7) Stitch gathered fabric securely into
a bunch. |
 |
8) Pull sides together and whip stitch
down back. |
 |
9)Take off fabric cover and turn inside
out to hide bunch, and back seam.
Put cover back on stand. |
 |
10) Start pulling in sides of fabric
and sewing together at the back. |
 |
12) Pull the fabric cover to the bottom
and stitch together. |
 |
11) Finesse the fabric until the
front of the stand is tight
and wrinkle free! |
 |
| Finished Product!! Here is what It looks like when I was done!!!! |
I really was pleased with how this necklace stand turned out! I like how heavy it is. It doesn't fall over when I am photographing my jewelry and need to make adjustments to the way the necklaces are laying. I also love the fact I can put pins in it to hang earrings off of when I do necklace/earring sets. The best part though, since I made it myself, I got to make it as big as I wanted! Its hard to find necklaces stand that are tall enough to display long necklaces. It took about a hour and a half to make, but that includes taking the pictures along the way. I hope this inspires you try making a stand out of stuff around your house! I would love to hear about it if you do :)
~Adrienne Adelle


P.S. If you want to make the back look more finished, just cut out a piece of matching colored felt and hot glue it onto the back. This will make it look finished from all angles.
ReplyDelete